Learn how to bake – and decorate – cakes
Published 10:41 am Thursday, October 10, 2019
|
Getting your Trinity Audio player ready...
|
Bless Your Spoon
By Stephanie Williams Dean
My mind’s been on cake.
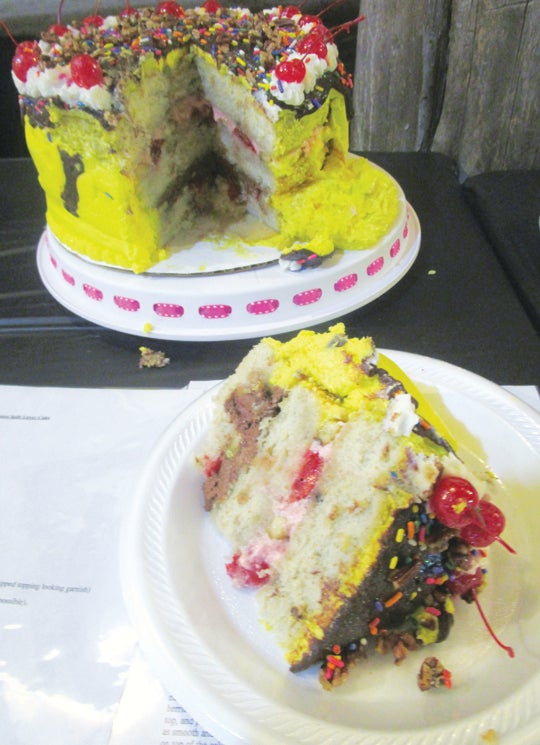
I tasted at least 35 bites of the many beautifully decorated, homemade, multi-layered, and sweet concoctions for the cake competition at the Dixie Classic Fair in Winston-Salem. Out of 100 points, judges were instructed to give up to 40 points for taste, up to 30 for texture, and up to 30 for appearance. Out of 75 cakes, only five went home with ribbons.
When I think of cakes, I’m always reminded of my favorite hometown bakery, Beckers Bakery, in Nashville, Tenn. No matter how many times my mother offered to bake my birthday cake from scratch, I always requested one from Beckers. While most kids might prefer a homemade cake, I always preferred the bakery’s cake.
It wasn’t just because of those perfectly hand piped, colorful flowers made from sweet buttercream that flirted with my visual system and tantalized my tastebuds. I loved birthday cake flavor – and still do.
After I had kids, the idea of purchasing a birthday cake began to compete with my domestic instinct. So around 1990, I signed up for a six week, basic cake decorating course taught by Mike Quinn at a specialty cake store in Winston-Salem.
Here, I learned the fundamentals of baking a better cake – and how to decorate one by hand.
I’m sharing with readers what I learned in hopes that you will improve your cake baking, and those of you who don’t feel you can do it, might gain some confidence.
Here was our class schedule:
Week One – Introduction, Supplies, Recipes, Mixing Colors. Students were given a supply list and introduced to supplies such as pastry bags, plastic couplers, metal piping tips, and recipes for icings. We were instructed to go home, make one recipe of fresh buttercream icing, and bring it these classes: #2, #3, #4, and #5. Here’s the recipe I was given.
FRESH BUTTERCREAM ICING
1 cup solid shortening (I use Crisco)
1 cup salted butter
1 tsp. vanilla extract
¼ tsp. lemon juice
2 pounds 10X confectioners sugar
½ tsp salt
Very warm water or milk
Mix shortening, butter, flavors, and salt. Add sugar and water (milk) alternately. Mix until creamy. It’s more spreadable than rose icing. If making in hot weather, add 2 Tbsp. of cake flour. Keeps in refrigerator for 2 weeks. To make Chocolate Buttercream Icing, add 6 oz. melted chocolate squares to the base, and then add the confectioners sugar.
Week Two – Borders, Stars, Lace, and Writing. Students were taught how to pipe borders, stars, dots, lace, and write using a pastry bag, couplers and tips, and our homemade icing. It’s easy once you try it.
Week Three – Cake Squares, Icing Cakes, Clown Figures. We had to bring a 9 x 13 sheet cake to class for cake square decorating and practiced decorating cake squares. I colored some of my icing a baby blue color and practiced piping each cake square using large, closed star tips and plastic clown heads on pics. Simple and cute. I began to believe I could do this.
Week Four – Flowers, Roses, Rose Buds, Drop Flowers. This week, each student had to bring a recipe of rose icing that was colored pink. Rose icing is what you use for flowers because it’s stiffer. We learned how to pipe roses, rosebuds, and drop flowers. We didn’t have to bring a cake for this class, thank goodness.
ROSE ICING
3 cups 10X confectioners sugar, sifted
½ cup solid shortening
1 tsp. vanilla extract
¼ tsp. lemon juice
½ tsp. salt
Water
Mix shortening, flavoring, and salt. Add sugar and very warm water. Use just enough water – start with 2 oz – to keep it from balling up. Icing should be creamy and stiff, but not dry. If making in hot weather, add 1 Tbsp. of cake flour. Keeps in refrigerator for 2 weeks.
Week Five – Character Cake, Stars. The final two weeks were spent making character cakes using star tips and basket cakes with flowers and leaves. We had to bring any shaped cake with a recipe for colored buttercream icing.
Week Six – Basket Cake With Flowers, Leaves. Students brought two 8-inch cake layers, 1 recipe of buttercream icing and 1 recipe of rose icing in two colors, green and lavender.
WHITE ICING
1 ¼ cup solid shortening (Crisco)
2 pounds 10Xconfectioners sugar
2 tsp. vanilla extract
1 tsp. butter flavor
¼ tsp. almond flavor
1 tsp. lemon juice
¼ tsp. salt
CAKE PAN GREASE
2/3 cup solid shortening (Crisco)
1/3 cup all-purpose flour
Mix until well blended. Use to flour and grease bottom and sides of cake pans. Store in a covered container. You can use Bakers Joy, but I don’t think it works as well as pan grease.
BIRTHDAY CAKE
1 box Duncan Hines French Vanilla cake mix – sifted 2 times
1 1/3 cup water
2 Tbsp. vegetable oil
3 large eggs
My instructor swore that if you sift twice the plain Duncan Hines cake mix, no one will ever know it’s not made from scratch – and this store made and sold wedding cakes.It is my cake mix of choice when I’m in a hurry and not baking one from scratch.
In a mixing bowl, combine cake mix, water, oil, and eggs. Mix well. Use metal pans and not plastic or glass. Coat the bottom and sides of two 8-inch cake pans with pan grease. Fill pans 2/3 full with batter. Cut through batter with a knife to release air bubbles before baking. Cool cake 10 minutes in pan. Put a doily covered board on top and flip the cake over. Boards and doilies are found at Walmart or specialty cake stores. Cool cake completely before freeing. Double wrap in Sarah Wrap and aluminum foil. A cake with buttercream icing is good 7 days if kept covered and cool. You can put in the refrigerator or leave at room temperature.
TIPS FOR BAKING CAKES
I’d say the number one mistake people make when baking cakes is cooking them too long. The recipe calls for a 35 minute bake time, so they preset the oven, put the cake in, set the timer for 35 minutes, and then come back when it’s done – and it’s overdone. But you won’t know it’s overdone until you taste it.
I always set my timer at least 15 minutes early, and after the timer goes off, I begin to check it every 5 minutes or so using a knife blade. If you’re making a layer cake, no one will ever see your knife blade. When you pull the cake out of the oven, you don’t want to see the middle jiggle. If the rest of the cake is done, you can pierce the middle with a few knife blades to allow the heat to get in there, which helps it bake faster. The cake should be springy and not firm. If there’s not a single crumb on the knife when you test it, it’s overdone.
Another mistake when you’re making a layer cake, when you pour the batter into the cake pans, you don’t want to just pour it all into the center. Pour it all around the pan evenly, so it prevents the final batter from settling in the center.
After beating your batter, be sure to scrape the bottom of the bowl and then beat again. But if you fail to beat it good enough, and you have thick batter at the bottom of the bowl, you don’t want to pour all that in the center because then the center won’t set up with the rest of the cake.
Also, a Kitchen Aid mixer is a must. Inadequate mixing is a main cause of cake failure.
And there are those times when you have to bake a cake longer than the recipe calls for.
One last tip, take a couple of paper towels and soak them in as hot water as you can. Wring out the towels but leave a little hot water in them. Straighten them out and lay them across the top of the cake after you pull the cake out from the oven. Do this a couple of times. Keeps the cake moist and also keeps the cake top from getting hard.
When baking, use premium, fresh ingredients, and no substitutions if you want your baked goods to turn out delicious. Yes, that means real salted butter, whole milk, extracts and not artificial flavorings, full-fat cream cheeses, sour creams, cottage cheeses, whipping cream, buttermilk, and no low-fat products.
I like to use brown eggs with dark baked goods and white eggs with lighter ones. The eggs purchased at the farmers market really improve the taste of baked goods. Cake time is splurge time.
Be sure to check those expiration dates on your baking powder and baking soda, too. Keep ’em fresh.
Remember, when you thaw out frozen baked goods, you must completely unwrap them when you first take them out of the freezer so that the condensation can escape while thawing.
Otherwise, your cake will be too wet.
BASIC TIPS/SUPPLIES NEEDED
#2, #3, #4– writing and outlining
#11 or #12 – piping figures
#16, #18, #21, #22, #199 – stars, borders, shells
#48 – basketweave
#68 or #352 – leaves
#104 – petals, roses, ribbons
#223, #224, #225 – drop flowers
Flower nail – #7 or #13
2-10-inch pastry bags
1 coupler for each bag
Spatula
Wilton’s Cake Yearbook.
For true color icings, use Cake Craft brand pastes or gels found on the internet or in specialty cake shops. Red won’t make a pretty pink, so you have to buy pink. When buying lavender, buy dark purple, so you get a whole range of colors. When using royal blue, don’t use too much as it gets s too intense. Always start with just a little paste as it goes a long way. Mix a shade lighter than you want as it will darken one shade darker on the cake. Colors will deepen at room temperature and with time. Give it time to set up. Colors most difficult to work with are red, black, and brown.
Happy decorating.